
Last week we had a brief look at the pack geometry manager for Tkinter, which is a GUI development toolkit for Python. We ran into some problems when we looked at a piece of configuration for pack called side. In this post, we're going to take a closer look at pack, and we're going to figure out how exactly to use side, and what it can do for us.
If you're not very familiar with Tkinter, or you have no idea what it is at all, I'd recommend looking at last week's post. We cover some of the basics there. We also have a section on Tkinter in our Complete Python Course.
The story so far
We've been exploring pack using a simple fixed sized window and a couple of rectangular Label widgets. The code looks something like this:
import tkinter as tk

root = tk.Tk()
root.geometry("600x400")

rectangle_1 = tk.Label(root, text="Rectangle 1", bg="green", fg="white")
rectangle_1.pack(ipadx=10, ipady=10)

rectangle_2 = tk.Label(root, text="Rectangle 2", bg="red", fg="white")
rectangle_2.pack(ipadx=10, ipady=10)

root.mainloop()
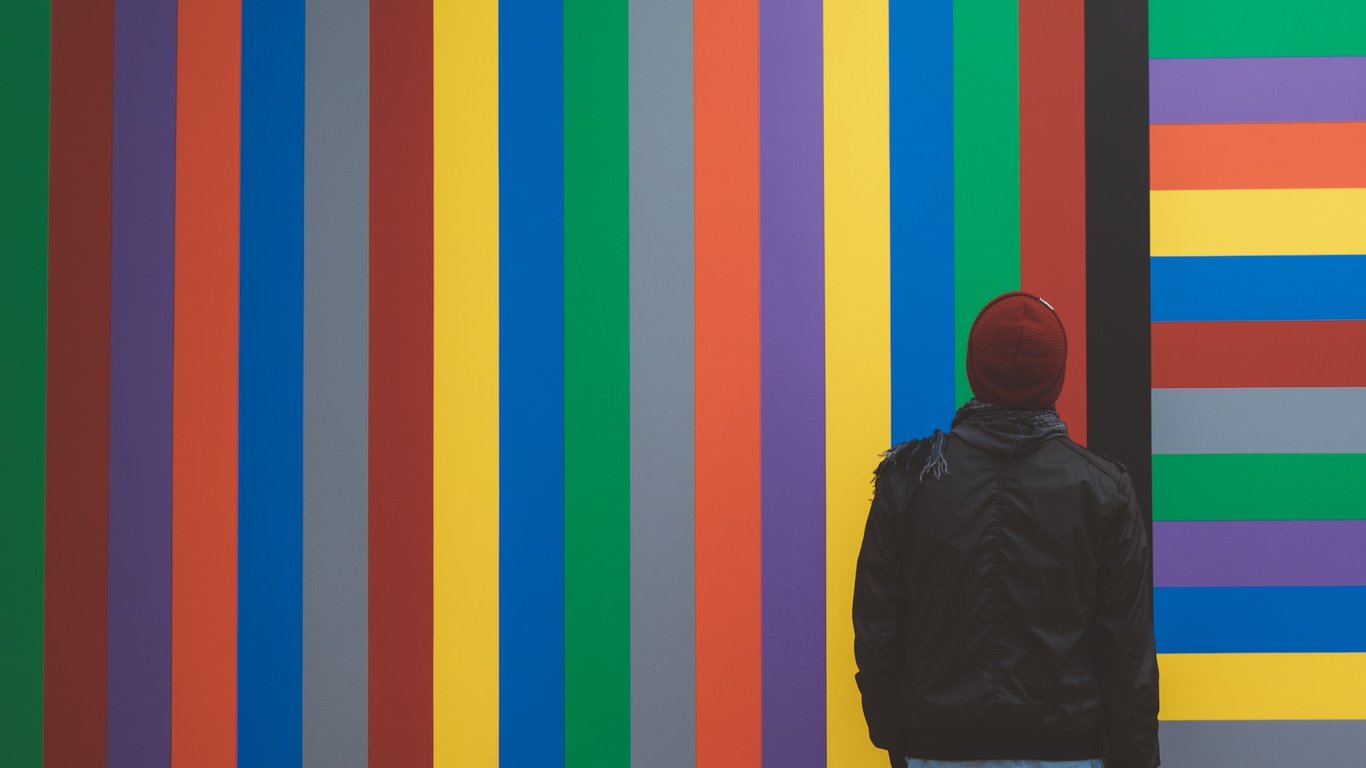
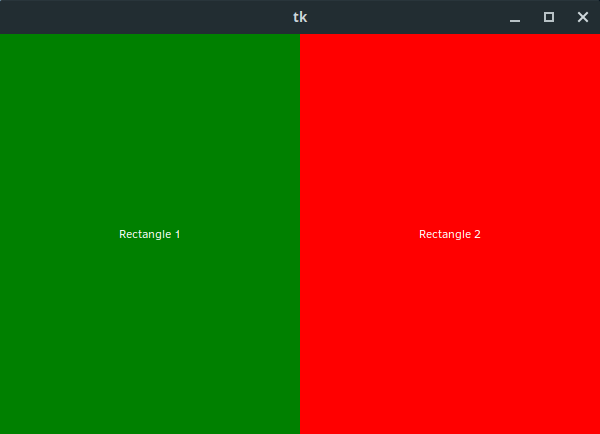
Here, the only configuration we've added for pack is some internal padding to make the Label content easier to read.
Right now, the application looks like this:
We explored two pieces of configuration in the last post: fill and expand.
The former allows us to specify how much of a widget's allocated area the widget actually fills. In Tkinter, every widget is assigned some amount of space in the window, but the widget doesn't necessarily use all of it. For example, the Label widgets in the window above are horizontally centred in an area which stretches across the entire width of the application window.
One thing we did learn about fill is that it doesn't allow a widget to consume excess space in the window. We can't make either Label widget fill the height of the container, because the area below rectangle_2 is not allocated to those Label widgets.
If we want to allow widgets to fill this excess space, we need to provide an extra piece of configuration called expand, which accepts a Boolean value. With expand set to True, widgets will grow to fill any excess space in the application window.
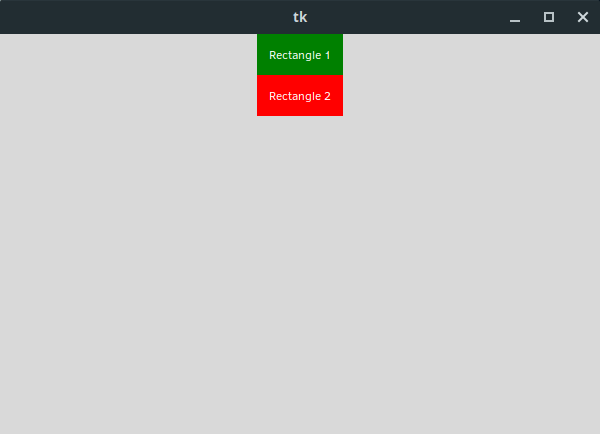
For example, setting fill="both" and expand=True on rectangle_1 yields the following:
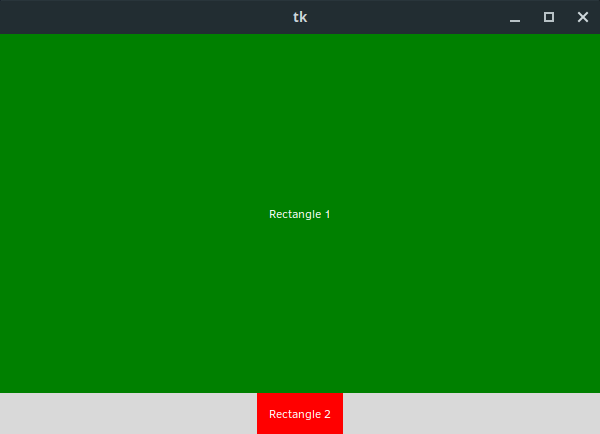
If more than one widget is has its expand configuration set to True, the widgets share the available space, even if the widgets don't fill that space:
However, when we set the side configuration on one of these widgets to "left", we saw that this rule didn't really hold up.
When we looked at this code:
import tkinter as tk

root = tk.Tk()
root.geometry("600x400")

rectangle_1 = tk.Label(root, text="Rectangle 1", bg="green", fg="white")
rectangle_1.pack(ipadx=10, ipady=10, side="left", expand=True, fill="both")

rectangle_2 = tk.Label(root, text="Rectangle 2", bg="red", fg="white")
rectangle_2.pack(ipadx=10, ipady=10, expand=True, fill="both")

root.mainloop()
We ended up with the following:

Instead of the available space being shared evenly, rectangle_1 took it all for itself.
We also discovered that if we set the side configuration of rectangle_2 to "left", everything went back to normal, albeit with the window split left to right, rather than top to bottom:
So, what's going on here?
Side basics
Before we look at how side interacts with with expand, let's look at some simpler examples.
side can take a number of different values, each of which is an edge or "side" of its container. In our case this is the application window. We can therefore provide any of "top", "bottom", "left", or "right" as values. By default, widgets have a side value of "top".
The normal use case for side is to change the placement of widgets in its container. For example, we can set side="bottom to have the widget anchored to the bottom of its container, rather than at the top. Using side in this way is fairly straight forward, but we run into issues when we combine different sides in a single container, especially when those widgets are allowed to expand.
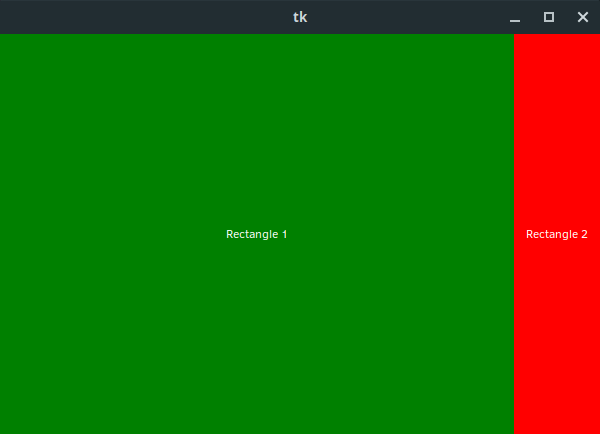
Let's look at what happens when rectangle_1 is set to side="left" and both rectangles have their fill configuration set to "both". This will show us the default space allocated to each widget by pack.
import tkinter as tk

root = tk.Tk()
root.geometry("600x400")

rectangle_1 = tk.Label(root, text="Rectangle 1", bg="green", fg="white")
rectangle_1.pack(ipadx=10, ipady=10, side="left", fill="both")

rectangle_2 = tk.Label(root, text="Rectangle 2", bg="red", fg="white")
rectangle_2.pack(ipadx=10, ipady=10, fill="both")

root.mainloop()
The code above gives us a layout like this:
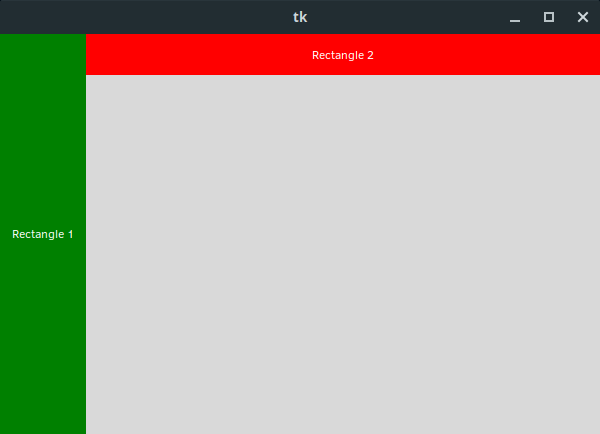
This is quite interesting, because we can see that rectangle_1 was allocated an area which stretches the entire height of the window, while rectangle_2 was allocated an area which stretches the width of the window.
We can also see that rectangle_1 was given precedence. We might be tempted to assume that side="left" is given precedence over the default side="top", since we've seen this in every case, but that would be a mistake. It's actually entirely down to the order in which items are added to the window.
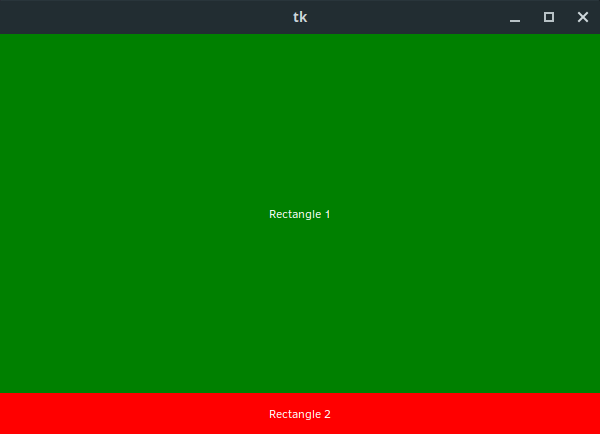
If we move rectangle_1 below rectangle_2 in our code, we see the opposite:
import tkinter as tk

root = tk.Tk()
root.geometry("600x400")

rectangle_2 = tk.Label(root, text="Rectangle 2", bg="red", fg="white")
rectangle_2.pack(ipadx=10, ipady=10, fill="both")

rectangle_1 = tk.Label(root, text="Rectangle 1", bg="green", fg="white")
rectangle_1.pack(ipadx=10, ipady=10, side="left", fill="both")

root.mainloop()
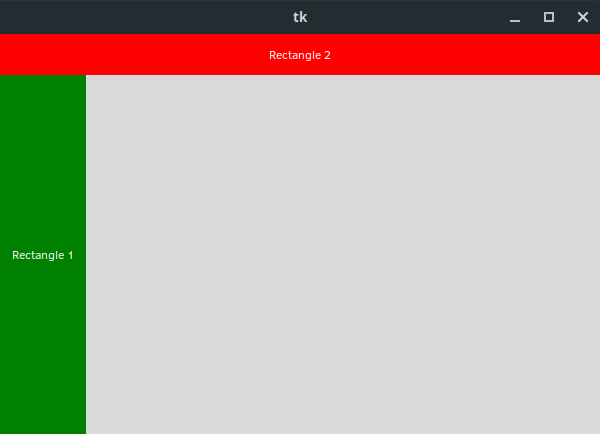
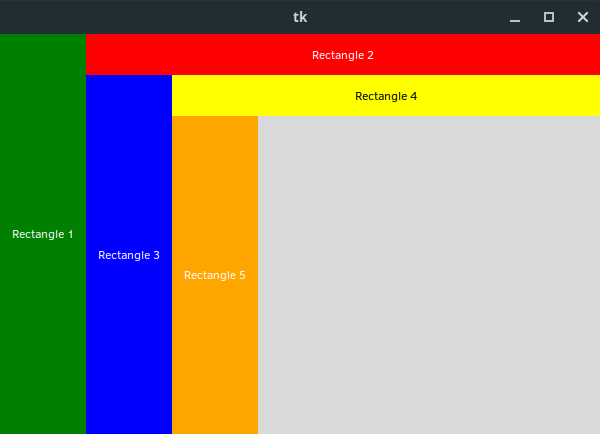
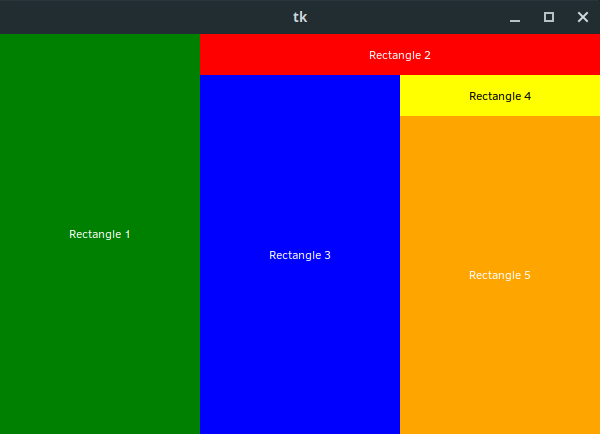
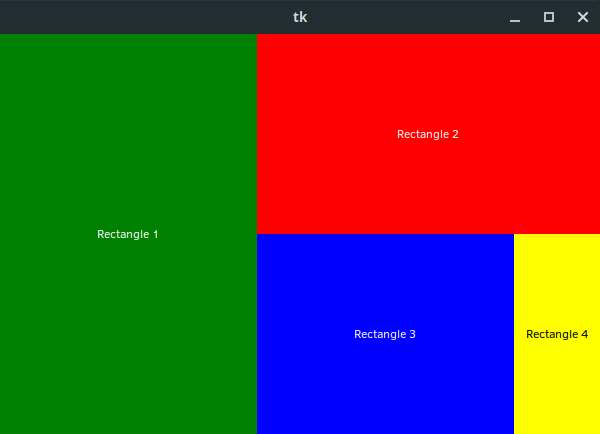
If we add more rectangles to the application window, we can see very clearly that the order of precedence is entirely down to the ordering of the widgets:
import tkinter as tk

root = tk.Tk()
root.geometry("600x400")

rectangle_1 = tk.Label(root, text="Rectangle 1", bg="green", fg="white")
rectangle_1.pack(ipadx=10, ipady=10, side="left", fill="both")

rectangle_2 = tk.Label(root, text="Rectangle 2", bg="red", fg="white")
rectangle_2.pack(ipadx=10, ipady=10, fill="both")

rectangle_3 = tk.Label(root, text="Rectangle 3", bg="blue", fg="white")
rectangle_3.pack(ipadx=10, ipady=10, side="left", fill="both")

rectangle_4 = tk.Label(root, text="Rectangle 4", bg="yellow", fg="black")
rectangle_4.pack(ipadx=10, ipady=10, fill="both")

rectangle_5 = tk.Label(root, text="Rectangle 5", bg="orange", fg="white")
rectangle_5.pack(ipadx=10, ipady=10, side="left", fill="both")

root.mainloop()
So, how does this all work with expand in the mix?
Side with expand
Just as before, the order in which we add widgets to the window is very important for how side interacts with expand. We can see this very clearly in the following two examples.
First, we're going to set expand=True and fill="both" for both rectangles, and side="left" for rectangle_1.
import tkinter as tk

root = tk.Tk()
root.geometry("600x400")

rectangle_1 = tk.Label(root, text="Rectangle 1", bg="green", fg="white")
rectangle_1.pack(ipadx=10, ipady=10, expand=True, side="left", fill="both")

rectangle_2 = tk.Label(root, text="Rectangle 2", bg="red", fg="white")
rectangle_2.pack(ipadx=10, ipady=10, expand=True, fill="both")

root.mainloop()
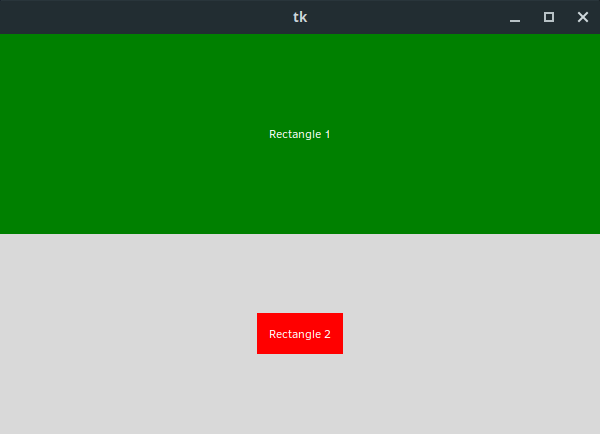
This gives us a layout like this:
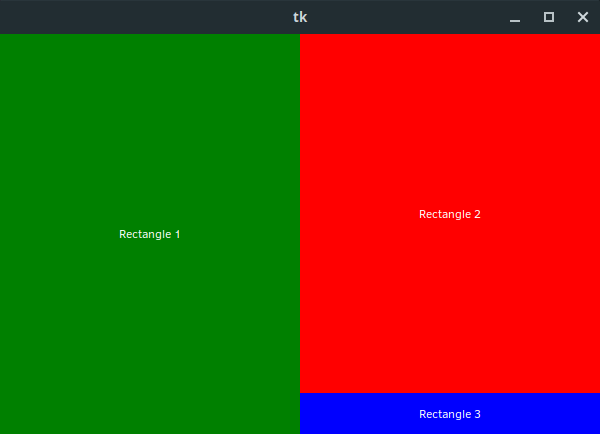
If we now switch things around so that rectangle_2 has side="left" instead, we end up with the following:
import tkinter as tk

root = tk.Tk()
root.geometry("600x400")

rectangle_1 = tk.Label(root, text="Rectangle 1", bg="green", fg="white")
rectangle_1.pack(ipadx=10, ipady=10, expand=True, fill="both")

rectangle_2 = tk.Label(root, text="Rectangle 2", bg="red", fg="white")
rectangle_2.pack(ipadx=10, ipady=10, expand=True, side="left", fill="both")

root.mainloop()
So what happens when we have more widgets?
Complex interfaces with side and expand
Let's go back to our five rectangle example, but this time, let's set some of the elements to expand instead.
import tkinter as tk

root = tk.Tk()
root.geometry("600x400")

rectangle_1 = tk.Label(root, text="Rectangle 1", bg="green", fg="white")
rectangle_1.pack(ipadx=10, ipady=10, expand=True, side="left", fill="both")

rectangle_2 = tk.Label(root, text="Rectangle 2", bg="red", fg="white")
rectangle_2.pack(ipadx=10, ipady=10, fill="both")

rectangle_3 = tk.Label(root, text="Rectangle 3", bg="blue", fg="white")
rectangle_3.pack(ipadx=10, ipady=10, expand=True, side="left", fill="both")

rectangle_4 = tk.Label(root, text="Rectangle 4", bg="yellow", fg="black")
rectangle_4.pack(ipadx=10, ipady=10, fill="both")

rectangle_5 = tk.Label(root, text="Rectangle 5", bg="orange", fg="white")
rectangle_5.pack(ipadx=10, ipady=10, expand=True, side="left", fill="both")

root.mainloop()
Now all of the odd numbered rectangles have expand=True as part of their pack configuration.
Interestingly, the space is still shared evenly between the widgets with side="left" as part of their configuration. The order in which we place widgets in the window doesn't affect how the space is shared between widgets with the same side configuration. This extends to parallel sides as well, so side="left" and side="right" are compatible for the purposes of sharing space.
However, when we have widgets with perpendicular side values, the order the widgets were added determines when a widget can claim space in the application window.
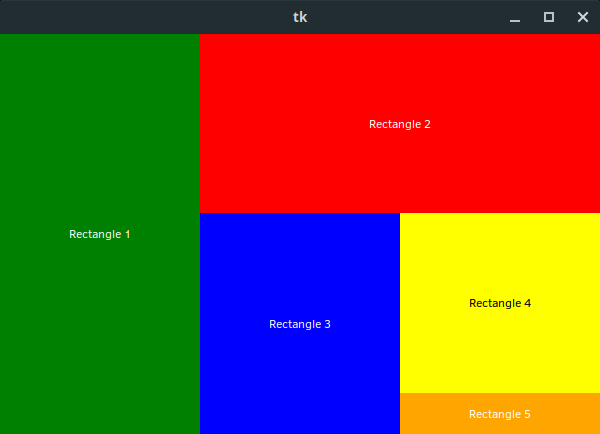
For example, if we add expand=True to every widget in the example above, we get the following:

Let's break this down.
rectangle_1 is the first widget placed in the application window, so it gets the entire height of the window allocated to it, and then expands into all of the available space. At this point, this is the entire application window.
When we add rectangle_2, it gets a narrow sliver on the right hand side of the application window, but it does fill up the entire height of the window.
Next we add rectangle_3 which has a side value of "left" and has been allowed to expand. Here a number of things happen. rectangle_1 is now forced to share its horizontal space with rectangle_3, which means it now only consumes half of the width of the application window. This means there is now more horizontal space for rectangle_2, so it fills up half the width of the window, and continues to take all the vertical space it can. It can no longer fill the entire height of the window, because rectangle_3 has taken space in the bottom right corner, but it still fills up most of the window height.
At this point, our window looks like this:
Next we add rectangle_4 which now forces rectangle_2 to share its vertical space. rectangle_4 slots in beside rectangle_3, taking up a narrow sliver of the horizontal space, but half of the vertical space. With rectangle_2 now sharing the vertical space, rectangle_3 now has space to grow in height, so rectangle_3 now also shares half the height of the application window.
We now have this:
Finally, we add rectangle_5 which causes a number of changes. It's another left aligned widget, so it forces both rectangle_1 and rectangle_3 to reduce the amount of extra space they claim in the horizontal direction. Each is now given just a third of the overall width.
This reduction in rectangle_1 and rectangle_3 allows rectangle_2 and rectangle_4 to also grow in width, with rectangle_2 claiming two thirds of the application window.
rectangle_5 now slots in underneath rectangle_4, giving us the result we saw earlier:
Wrapping up
That's it for this week's post on side values and pack! If you're interested in learning more about Tkinter and GUI development, check out our brand new course: GUI Development with Python and Tkinter.
You might want to also follow us on Twitter, as we'll be releasing more posts on Tkinter in the near future, including some mini-project walkthroughs.